RustDesk: Your Open-Source & Secure Remote Desktop Solution
Say goodbye to TeamViewer and its limitations. RustDesk is a powerful open-source alternative for remote desktop control, self-hosted on your VPS. Performance, security, and total control: that’s what we love.
Why RustDesk?
RustDesk offers a complete remote desktop solution with end-to-end encryption, self-hosting capability, and a simple interface. Perfect for managing your servers, helping your loved ones, or working from anywhere.
Key Advantages
- Open-Source: Source code available, security audit possible
- Self-Hosted: Control your own ID and relay servers
- Performance: Written in Rust, fast and lightweight
- Multi-Platform: Windows, Linux, macOS, Android, iOS
- Encryption: Sessions are end-to-end encrypted
How does it work? (The theory minute)
Before pasting commands, let’s understand what we are about to deploy. The open-source RustDesk server is two small programs, not one:
- hbbs, the ID / rendezvous server. Each client registers with it and gets an ID (the number you read out to a friend). When A wants to reach B, hbbs introduces them and helps them punch through their routers (NAT hole punching). It also holds the server’s key pair.
- hbbr, the relay server. If A and B can’t talk directly (strict NAT, corporate firewall…), the traffic goes through hbbr instead. It’s slower and uses your VPS bandwidth, but it works.
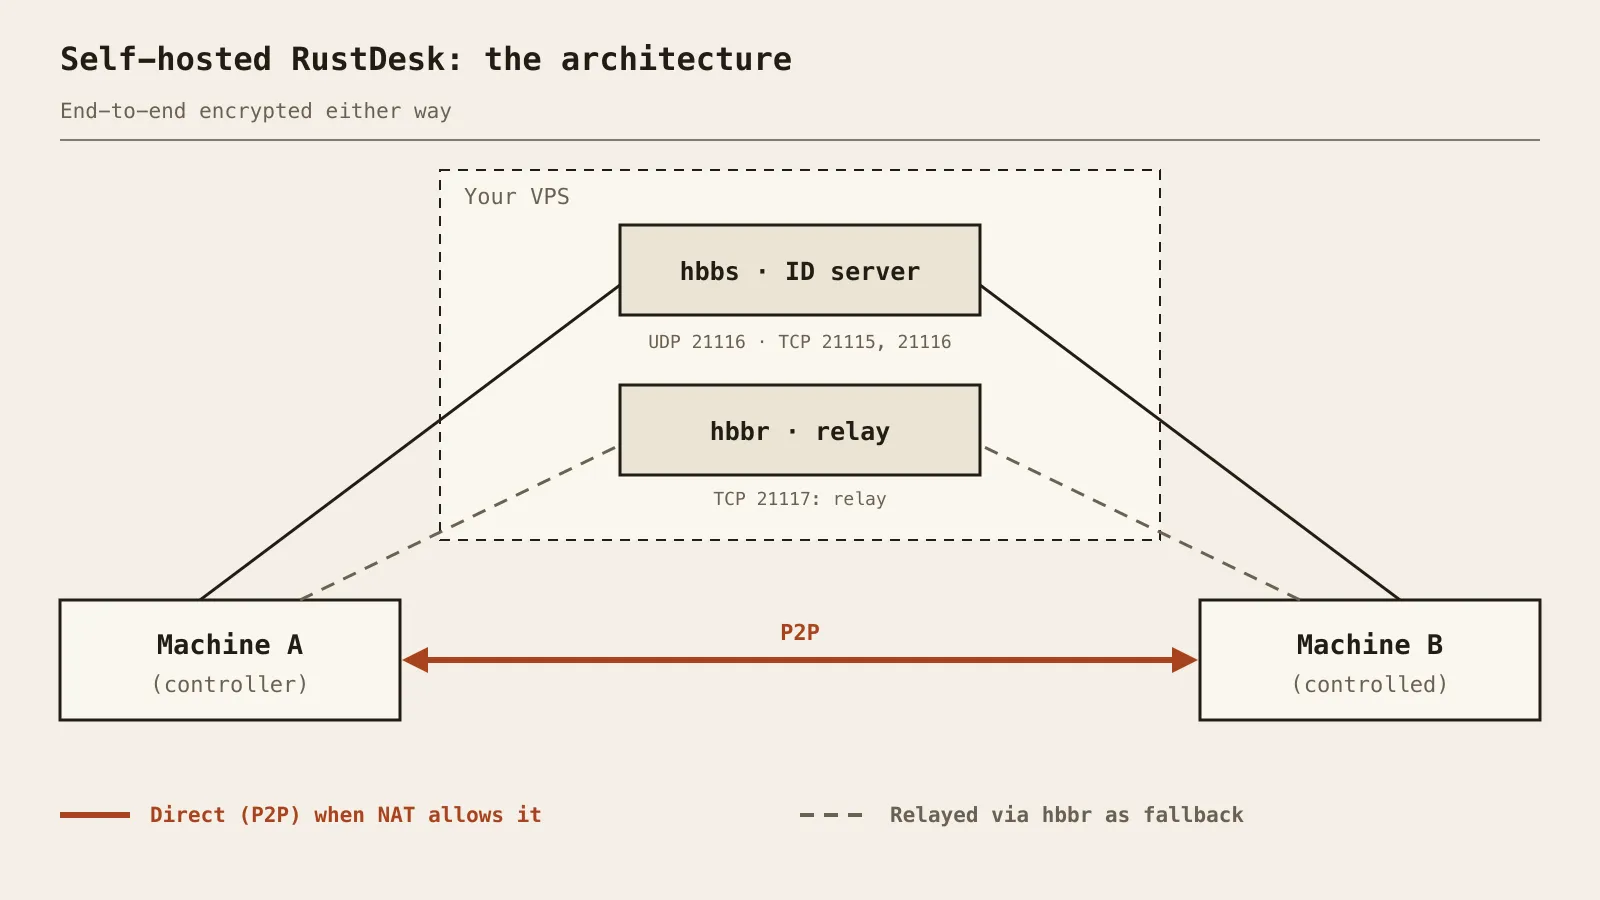
In the ideal case the connection is direct (P2P) between the two machines: the VPS only played matchmaker. Otherwise it is relayed. Either way, the session content is end-to-end encrypted between the two clients: the relay only forwards data it can’t read.
And the key pair? On first start, hbbs generates id_ed25519 (private, stays on the server) and id_ed25519.pub (public). Clients are given the public key, and that’s how they know they’re talking to your server and not an impostor. Keep that in mind, we’ll need it.
Prerequisites
- A VPS with a public IP (mine is an OVH VPS: 4 vCores, 8 GB RAM, 75 GB SSD, Ubuntu Server). Honestly, RustDesk’s server is light: a far smaller VPS would do.
- Docker and the Docker Compose plugin (
docker compose versionshould answer). - Optional but nice: a DNS A record such as
rustdesk.example.compointing to<VPS_IP>. You can use the bare IP instead.
Step 1: The Docker Compose file
The first version of this post used a single docker run. That was wrong: the official image contains both binaries, and you need to start two containers, one for hbbs and one for hbbr. This is the Compose file from the official documentation:
mkdir -p ~/rustdesk && cd ~/rustdesk
nano compose.yamlservices:
hbbs:
container_name: hbbs
image: rustdesk/rustdesk-server:latest
command: hbbs
volumes:
- ./data:/root
network_mode: "host"
depends_on:
- hbbr
restart: unless-stopped
hbbr:
container_name: hbbr
image: rustdesk/rustdesk-server:latest
command: hbbr
volumes:
- ./data:/root
network_mode: "host"
restart: unless-stoppedTwo things to note:
network_mode: "host"(Linux only) lets the servers see the clients’ real IP instead of the Docker bridge’s, and it means noports:section is needed. The official docs suggest trying without it if you run into connection problems.- Both containers share
./data, mounted on/root: that’s where the key pair lives.
Step 2: Open the firewall
With host networking, Docker doesn’t publish ports for you, so open them in ufw. Only these are needed for a classic setup:
sudo ufw allow 21115/tcp   # hbbs: NAT type test
sudo ufw allow 21116/tcp   # hbbs: hole punching and connection
sudo ufw allow 21116/udp   # hbbs: ID registration and heartbeat
sudo ufw allow 21117/tcp   # hbbr: relay
sudo ufw status
Here is the full port map, as documented:
| Port | Protocol | Service | Role |
|---|---|---|---|
| 21114 | TCP | hbbs | Web console, Pro only: not needed |
| 21115 | TCP | hbbs | NAT type test |
| 21116 | TCP and UDP | hbbs | UDP: ID registration and heartbeat. TCP: hole punching and connection |
| 21117 | TCP | hbbr | Relay |
| 21118 | TCP | hbbs | Web client support (optional) |
| 21119 | TCP | hbbr | Web client support (optional) |
The classic mistake is forgetting that 21116 must be open in both TCP and UDP.
If your OVH VPS has the optional Network Firewall enabled in the OVH control panel, it filters before
ufweven sees the packets: add the same rules there too.
Step 3: Start it and grab the public key
docker compose up -d
docker compose ps
docker logs hbbs
On first start, hbbs generates the key pair in the data folder. Read the public key:
cat ~/rustdesk/data/id_ed25519.pubCopy that string (a short base64 line). It’s the Key your clients need.
Step 4: Configure the clients
Install the RustDesk client from the official site on each machine (desktop or mobile). On desktop, click the menu (⋮) next to your ID, then Network, unlock the settings (admin rights needed) and fill:
- ID Server:
rustdesk.example.com(or<VPS_IP>). You can append the port,:21116. - Relay Server:
rustdesk.example.com, or leave it empty: the docs say RustDesk can infer it (it’s hbbr, port 21117). - API Server: leave empty. It’s for the Pro edition only.
- Key: the content of
id_ed25519.pub.
Click Apply. On Android and iOS it’s the same menu, in the app’s settings under the network/server section. Do it on both the controlling and the controlled device. Tip: configure one client, use Export Server Config, then Import Server Config on the others.
After a few seconds the ID shown on the main screen should lose its “not ready” status: the client is registered with your server.
Step 5: Test it
Connect from one machine to the other with its ID and password. In the session window, the lock/security icon tells you how it’s going: it says whether the connection is direct or relayed, and that it’s encrypted.
Want to see the difference? Test on the same network or from two different networks. Direct is the norm when NAT allows it; relayed is what you’ll see behind strict firewalls. You can also watch the logs while connecting:
docker logs -f hbbrIf hbbr logs activity during your session, you’re going through the relay.
Keep it up to date
cd ~/rustdesk
docker compose pull
docker compose up -d
docker image prune -f
Your ./data folder (and thus your key) survives upgrades.
Security hardening
- Open only what you need: 21115, 21116 (TCP+UDP), 21117. Keep 21114 closed (Pro only).
- Web client ports (21118/21119): keep them closed unless you use the web client. If you do, expose them only through a reverse proxy that sets
X-Real-IP, and firewall them so that only the proxy can connect: the docs warn that the servers trust those headers without validating them. - Enforce the key: add
-k _to both commands (command: hbbs -k _andcommand: hbbr -k _) so that clients without your key can’t use your servers, thendocker compose up -dagain. Heads up: some users report this not behaving as expected, so always test with a client that has no key configured. - Back up the key pair: copy
id_ed25519andid_ed25519.pubsomewhere safe. Lose them and every client must be reconfigured with the new public key. And never publish the private one. - Use a strong permanent password on the machines you control, and keep clients up to date.
Troubleshooting
- “Key mismatch” / “Wrong key”: the Key field doesn’t match the server’s
id_ed25519.pub. Recopy it without trailing spaces, and check you didn’t regenerate the data folder. - ID never gets registered, or stuck on “Connecting…”: the usual suspect is UDP 21116 blocked by
ufwor by OVH’s Network Firewall. Check TCP and UDP. - Direct works, relay doesn’t (or the opposite): check 21117/TCP, and that hbbr is running (
docker compose ps). - Still stuck: try removing
network_mode: "host"and publishing the ports instead, as the docs suggest, and readdocker logs hbbsanddocker logs hbbr.
And there you go! Your own RustDesk server, with an ID server, a relay and a key that only your clients know. No more third-party servers in the middle, and the remote desktop that works the way you want.